Hey everybody, this is just a quick one today. I wanted to share a document with you all of some hints and tips that are necessary for creating amigurumi. I've attached a link for a google drive document (it's a pdf) with pictures, information, and some links that may be useful. It also has some directions on how to use ravelry and searching for patterns and saving them for later.
Here's the link:
https://docs.google.com/file/d/0B-MLDmz4KulwMGRicXdWRzk3MHc/edit
If anyone has any questions or problems, just leave a comment below.
Thursday, 20 June 2013

Thursday, 6 June 2013
Habit of the Week: the Pomodoro technique
Pomawhat?
The Method
It's such an easy method that I can guarantee you won't forget it:
How it works
Here's an android app that's free to use, called Pomodroido.
A free app for the iPhone, the Simple Pomodoro Timer
And a free web app / desktop application: http://www.focusboosterapp.com/
Let me know in the comments if you have found any handy tools that you use in conjunction with the pomodoro technique.
Pomodoro! I'd like to share one of my favourite tips with you all, that resonates with the "Little and Often" post from last week. This method is by far the best and easiest way to get your butt in gear and get your important tasks done, without feeling stressed, overwhelmed or exhausted.
 |
| Source: zirtual.com |
It's such an easy method that I can guarantee you won't forget it:
Set a timer for 25 minutes. Work on your task for the whole 25 minutes with no distractions. Once the timer goes off, reward yourself with a 5 minute break. This is a 'pomodoro'. Repeat this cycle of 25/5 three or four times then have a longer break of 20 minutes before returning to the 25/5 cycle.
The beauty of this is that you can alter the increments to suit your needs, such as ADHD, depression, physical impairments, and so on. I've used a couple of variations over time: 20/10, 15/15, 30/30, 45/15. It's up to you to pick what timings will suit your needs.
But don't slack off! Don't be silly and do 5 minutes of work with 55 minutes of rest. That's just cheating the system and to be honest won't really show you any progress. Try and aim for as much work as possible without overtiring yourself.
And remember, no distractions! Put your phone away, turn off the TV, get off YouTube and Facebook, and just focus on your task. It's okay to leave your emails unattended for 25 minutes, you can check them in your break!
How it works
All it does is force you to break up your task into smaller pieces that are more manageable. It forces you to question the task and ask yourself "right, what bit can I get done in the next 25 minutes?". It aims at making you focus and get large tasks done bit by bit.
Take, for example, a 2,000 word essay, a 10 page report, or a household to clean. In one pomodoro you could, read a chapter relevant to your subject; focus on getting 500 words of your report done; tackle the dishes and put them away. Don't think about everything else that needs doing once you're done, just focus on getting this one section of 25 minutes completed. Take your break, and then consider what your next move is.
Over time, you will learn from experience for how long it takes you to get certain tasks done. It may take you 5 pomodoros to get the house clean. With this knowledge, you can plan your days better, knowing when you have enough time to get everything done, and how much work you can realistically get done in a day. You will develop self-discipline along the way and eventually find that tasks are easier and more manageable to complete.
 |
| Source: preparedpantry.com |
Go try it out!
Here's an android app that's free to use, called Pomodroido.
A free app for the iPhone, the Simple Pomodoro Timer
And a free web app / desktop application: http://www.focusboosterapp.com/
Let me know in the comments if you have found any handy tools that you use in conjunction with the pomodoro technique.
~ It's never too late in the day to start your day over ~
Saturday, 1 June 2013
Crochet Chirpy Bird Tutorial
Look at this adorable little fella! Isn't he just so cute? I named him Chirpy Bird because he's so pudgy and cute, and looking at him makes me feel happy due to his lovely, bright colours.
 |
| Chirpy Bird! |
(Update: I've just amended the typo error for the legs in the pattern.)
Check out this Ravelry link to find a pdf of this pattern.
Details
·
3.5mm hook
· Small amounts of Sirdar Snuggly Baby Bamboo
o
4 colours for body
o
Orange for feet
o
Yellow for beak
·
9mm safety eyes
·
Toy stuffing
·
Tapestry needle
# ‘inc’ = 2 sc in one stitch
# ‘dec’ – decrease across next two stitches
Tips
For the joining of colours, you may want to check out this video by June Gilbank of Perfect Stripes for Amigurumi (YouTube). It creates a nice and easy seamless join.
For the decreases I like to use the method displayed by Nerdigurumi that creates an Invisible Decrease (YouTube). It really does create an invisible decrease that is hard to spot.
Tips
For the joining of colours, you may want to check out this video by June Gilbank of Perfect Stripes for Amigurumi (YouTube). It creates a nice and easy seamless join.
For the decreases I like to use the method displayed by Nerdigurumi that creates an Invisible Decrease (YouTube). It really does create an invisible decrease that is hard to spot.
Body
Each row is an
increase of 6. For each line, 1 sc is added between the inc’s in order to add 6
per round. Usually a pattern would read *1 sc, inc*; *2 sc, inc*; *3 sc, inc*;
and so on, but I have split up the even rounds to avoid that hexagonal shape
that forms when the inc’s are stacked round by round.
Overview: Increase by
6 stitches for the first 12 rounds. Sc around for the next 12 rounds. Decrease
by 6 stitches for the last 12 rounds.
Note: when changing
colours, make sure to tie the loose ends as you go. I simply double knotted my
loose ends together across the back.
In Pink:
1. 6 sc in a magic ring [6]
2. Inc around [12]
3. *1 sc, inc* around[18]
Change to Blue:
4. 1 sc, *inc, 2 sc* around, 1 sc [24]
5. *3 sc, inc* around [30]
6. 2 sc, *inc, 4 sc* around, 2 sc [36]
Change to White:
7. *5 sc, inc* around [42]
8. 3 sc, *inc, 6 sc* around, 3 sc [48]
9. *7 sc, inc* around [54]
Change to Green:
10. 4 sc, *inc, 8 sc* around, 4 sc [60]
11. *9 sc, inc* around [66]
12. 5 sc, *inc, 10 sc* around, 5 sc[72]
Change to Pink:
13 – 15. Sc
Change to Blue:
16 – 18. Sc
Pause here to insert the safety eyes on the row between the
Pink and the Blue.
Change to White:
19 – 21. Sc
Change to Green:
22 – 24. Sc
Change to Pink:
25. 5 sc, *dec, 10 sc* around, 5 sc [66]
26. *9 sc, dec* around [60]
27. 4 sc, *dec, 8 sc* around, 4 sc [54]
Change to Blue:
28. *7 sc, dec* around [48]
29. 3 sc, *dec, 6 sc* around, 3 sc [42]
30. *5 sc, dec* around [36]
Change to White:
31. 2 sc, *dec, 4 sc* around, 2 sc [30]
32. *3 sc, dec* around [24]
Pause here to stuff the body with toy stuffing.
33. 1 sc, *dec, 2 sc* around, 1 sc [18]
Change to Green:
34. *1 sc, dec* around [12]
35. dec around [6]
36. Cut yarn, thread needle, and sew up end. Tie up.
Beak
Here we create a circle that we will fold into a semi-circle and use, when stuffed, as the beak.
In Yellow:
1. 6 sc in a magic ring [6]
2. Inc around [12]
3. *1 sc, inc* around[18]
4. 1 sc, *inc, 2 sc* around, 1 sc [24]
5. *3 sc, inc* around [30]
Cut yarn, leaving a long tail. Fold the circle in half and begin to sew the two edges together. This should start to create a semi-circle. Stuff the beak lightly when ¾ of the seam has been sewn. Once complete, use the long tail to sew the beak to the body. Sew the flat side of the semi-circle to the row between the Blue and White colour-change on the body. This is the halfway point of the body.
Wings
Note: when changing colours, make sure to tie the loose ends as you go. I simply double knotted my loose ends together across the back.
In Pink:
1. 6 sc in a magic ring [6]
2. Inc around [12]
3. *1 sc, inc* around[18]
Change to Blue:
4. 1 sc, *inc, 2 sc* around, 1 sc [24]
5. *3 sc, inc* around [30]
6. 2 sc, *inc, 4 sc* around, 2 sc [36]
Change to White:
7 – 9. Sc around
Change to Green:
10 – 12. Sc around
Cut yarn, leaving a long tail. Flatten the piece, do not stuff. Sew the wings onto each side of the body on the same row that the eyes are attached. When sewing across, make sure to include both sides of the green wing to avoid any holes.
Legs
In the body, we
staggered the inc’s and dec’s in order to avoid the stacking that creates the
hexagon shape. For the feet, we want that hexagonal shape so we will
purposefully stack the inc’s and dec’s.
In Orange:
1. 6 sc in a magic ring [6]
2. Inc around [12]
3. *1 sc, inc* around[18]
4. *2 sc, inc* around [24]
5. *2 sc, dec* around [24]
6. *1 sc, dec* around [12]
7. dec around [6]
8-11. sc around
Cut yarn, leaving a long tail. To shape the feet, push the
base of the foot towards the leg – this should create a flat, hexagonal foot
shape. Do not stuff. Attach the legs to the row between the pink and blue
stripes. Line up the legs so that they are the midpoint between the eyes and
wings on each side.

And there you go! You've made your very own Chirpy Bird!

Enjoy!
Thursday, 30 May 2013
Habit of the Week: Nice Shiny Patches; Little and Often
Think about all the things that you need to get done right now. Think of all of it. Your work, your school, your housework, your projects, your bills. Scary, right?
 |
| Is this what's in your head right now? Source: pocketchanged.com |
Now, stop thinking about it all. Sounds like a stupid thing to say, when I've just told you to think about it, but first things first: Make lists. Go away, write down all those scary things onto lists (multiple lists separated by type would be a plus!), then come back with a clear mind. Done it? No? You should! I did.
Lists are one of the greatest tools you can use when feeling overwhelmed by having lots to do. They allow you to put things down, pen on paper, fingers on keys, and not worry about forgetting anything important as it's all written down. You can allow those nagging thoughts to leave your mind, and come back to them when you're ready. Back to my point.
Don't do all of it: just get started
This applies to any large and taunting task, really. The perfectionist inside you is probably making the task out to be a Big Scary Thing because you worry you won't do it perfectly. And everybody knows, if you don't do any of it, you can't fail being perfect as you never tried! Hurray...?
Ignore that voice, and just do a little bit. I'll give you some examples.
I was in the bathroom the other day, brushing my teeth. I was idly looking around, as I do when I'm standing there with a mouth full of toothpaste, and noticed that the sink was a bit grubby. I don't know about you, but in my home this soapy watery gloop puddles up on the sink near the soap dispenser. Yuck. Most days I put my blinkers on and don't notice it. Not that day. As soon as I was finished brushing my teeth, I decided I'd wipe it. Just that little bit. I wanted to get rid of the gloopy stuff, and nothing else. So I did. I wiped it all up (with toilet paper or something, I forget) and felt better that I'd made a tiny patch better. Nice Shiny Patch. I then grabbed the bristly brush from under the sink and decides to scrub the rest of the sink area, just because I wanted the Nice Shiny Patch to be a bit bigger, and encompass the whole sink. A few minutes later, the whole sink was a Nice Shiny Patch, and I felt accomplished.
...I then made the fatal mistake of looking around at the rest of the bathroom, and noticing more mess. I felt disheartened that my Nice Shiny Patch was so tiny and insignificant compared to the rest of the bathroom. The thought of doing the same to the whole bathroom was pretty daunting. So that's when I learnt my next point:
When feeling in a good mood, I like to spontaneously buy cleaning supplies. I don't necessarily know how to use them, or where to use them, but I feel that if I own cleaning supplies, I can feel better about my messy home. On a recent trip, one of those cleaning supplies happened to be a grout cleaning brush. It cost £1 from a local Staples store. It has a long handle about 8" long, and hard bristled on the end. But the bristles on this brush are in a thin, long line. A bit different to regular scrubbing brushes you find. That was why this one is designed to clean grout.
 |
| A grout brush, quite similar to the one I own Source: nationwidejanitorialsupply.com |
Cleaning grouting between tiles was something I never really considered doing. As a young person who recently left the family home, this is all new to me. But I put my new brush in the bathroom, hoping it would do the cleaning itself. It didn't.
Once again, I found myself brushing my teeth, looking around. This time I spotted the tiles. I had the sudden urge to clean the tiles. Not all of them, but one particular patch under the shower unit that was getting a bit grimy from the moisture. So I attacked it and cleaned around about 9 tiles. I made a Nice Shiny Patch!
This time, while admiring my Nice Shiny Patch, I ignored the fact that my whole bathroom is tiled floor to ceiling. I didn't care, I had made a good start. I vowed to myself I would do a Little At A Time.
 |
| Left: after; Right: before. |
I thought I'd add a picture to show what I'm on about. It's sort of hard to tell in these pictures, but there's definitely a orangey tinge to the grout in the right picture, that I eliminated in the left. These pictures don't do it justice just how gross it originally was. But I made a Nice Shiny Patch!
...but do it Often.
Of course, it's all well and good making a Nice Shiny Patch, but it's not very handy when it gets all dirty again, or when the patch stays little. The aim is to make your Nice Shiny Patch bigger by cleaning around it, and then joining up Shiny Patches together to make a Nice Shiny Room!
So now, every time I brush my teeth, I wipe the sink, and make the Shiny Patch a bit bigger. Every time I have a shower, I take a minute to make a Shiny Patch on the tiles with my new grout brush. Soon the whole shower area will be a Nice Shiny Shower! I've even got a grout brush to use in the kitchen on the tiled counter-tops to clean the grout there, as I want a Nice Shiny Counter-top too!
I just love to walk into a room and see my little bits of effort, and my little bits of progress against daunting tasks. The key to Little and Often is that it consists of two parts: do a Little at a time, but make sure that you do it Often enough that it counts. By incorporating this habit into your life, you can make it a little bit easier for yourself to tackle daunting tasks and make a manageable household.
To Summarise
Little and Often, and focus on making Nice Shiny Patches. Have your supplies ready to tackle the little spots regularly. There's no shame in only doing a little bit. You're aiming to improve your home and if the best method is to do it bit by bit, and not all in one go, then by all means, go forth with your Nice Shiny Patches and make them gradually multiply so you have Nice Shiny Rooms and Nice Shiny Homes!
Sunday, 26 May 2013
I'm back!
I've got a couple of tutorials lined up of crochet patterns that I've made, and I need to photograph and document those, so expect those within the next few months. I'll also be posting general posts about the things that I've recently made, or any hints and tips for general things around the home.

- I need to sort out my camera and my photo editing and uploading system so I can add all my lovely photos of things around my home
- I need to update my ravelry with these pictures of all the things I've made over the past year
- I need to work on my pattern tutorials and put these out onto the blog over the next few months
...and one last thing: I'm going to be taking part in the Thirty Days Project. This will consist of 30 days of creating and crafting. You stick to one thing for 30 days, e.g. origami, painting, and post your results through the month. It begins on June 1st, and I encourage all to take part. I'm going to be focusing on drawing, as it is a hobby that I used to love but dropped out of doing. As drawing is not the main focus of this blog, I'll be grouping together my daily entries into weekly or biweekly posts, so you still get to see them but aren't bombarded by drawings every day!
So that's it for now, but keep your eyes peeled as I will be posting again very soon with my crochet tutorials and my 30 days of drawing!
Thursday, 12 April 2012
Crochet drawstring pouch pattern
So sorry about the delay in posting - I have nothing to offer except excuses about uni work and travelling home. As an apology, here is a pattern that I have adapted from a previous pattern, found here:
http://ahappyone.wordpress.com/2010/08/27/crochet-drawstring-bag-pattern/ - the user 'ahappyone' created this, and put it on her blog. I have simply changed it to crochet a much smaller bag on smaller needles. I needed a much smaller one for my game tokens for one of my board games, hence why I adapted it. All credit goes to 'ahappyone' for this pattern, I have simply adjusted it to create a smaller bag.
Drawstring pouch

I used a 4mm hook, and some scrap yarn that I had with no label (so, it was probably a 50g ball of merino, which I used a lot less than half of). It is a very simple pattern, and should be a nice, easy starter pattern for someone starting out with crochet, like myself.
Like the original poster said with her pattern, use a stitch marker. It's so much easier than trying to keep track of the stitches. Also, I use UK terms.
Abbreviations:
sc - single crochet
mc - magic circle
sc inc - single crochet increase
dbl - double crochet
sc dec - single crochet decrease
tbl - treble crochet
hdc - half double crochet
sl st - slip stitch
Pattern
 |
| The beginning of the bottom of the bag |
Bag:
rnd 1: sc6 in a mc
rnd 2: sc inc around
rnd 3: *sc, sc inc* around
rnd 4: *2sc, sc inc* around
rnd 5: *3sc, sc inc* around
rnd 6: *4sc, sc inc* around
rnd 7: *5sc, sc inc* around
rnds 8-12: dbl around
rnd 13: *5sc, sc dec* around
rnd 14: dbl around
rnd 15: tbl around
rnd 16: 1dbl, 1hdc, 1sc, 1sl st. FO.
 |
| Perfect size for my LOTR card game tokens. |
Make a foundation chain around 18" long. FO, trim ends, and weave through the tbl row.
 |
| Foundation chain |
 |
| Finished pouch (when flattened) |
So there you have it. A little drawstring pouch. I'm making more for my other board games that have loose pieces.
Wednesday, 21 March 2012
Mild Chicken Curry recipe
Today I'm going to be posting about a really cheap, quick, easy, and yummy recipe for a mildly spicy chicken curry:

This was really cheap, served two very hungry people, and took about an hour and a half to cook. I got this recipe from my Mum, who made it for me last week for the first time. I loved it so much, I had to make my own!
I got all of my ingredients cheaply from Asda. Here's what you'll need:
- A 2litre pyrex container with a lid (or any container, with a lid, that you can use in the oven)
- Mild curry sauce (I used Asda smart price sauce)
- Sliced chicken (I used Asda-brand frozen chicken slices)
- Frozen peas
- An onion
- Basmati rice (I used a microwave packet which was enough for two)
- Naan bread (again, I used Asda's own)
- and, dough balls with garlic and herb spread
All of this cost around £6.65. Usually, buying better quality food is worth it, but this was really nice with all these cheap things. The sauce itself was only 39p!
To make:
Defrost the chicken slices for an hour or two. They don't have to be completely defrosted, but it just makes it easier if they are.
Preheat the oven to around 200°C (or 180°C if you have a fan oven).
Throw in the chicken, half a bag of peas, and half a finely chopped onion.
Now, add the sauce to the dish. Depending on the sauce you buy, might mean you have to do something different - for example, with the brand I used, it says to pour in the sauce, then half-fill the jar with water, and pour that in too. Some brands may be different.
Mix it all up, making sure all the chicken, peas and onion are covered, add the lid, and put it in the oven.

This curry should be left in the oven for over an hour. Stir every 20-30mins. Make sure the chicken is hot, and the onion is soft.

Just before getting ready to serve, the naan bread should be heated in the oven for ten minutes - don't forget to sprinkle both sides of each piece of bread before you put them in. Also, cook the dough balls (or garlic bread) for however long the packet says.
The rice that I used took two minutes in the microwave. I put that on as soon as I took everything out the oven, ready to dish up.

And there you have it! If you're cooking for more than two, simply use more rice, naan bread and dough balls.

It was such a yummy dinner. Upon finishing, my partner said it was the best curry he'd ever had, even compared to restaurants. I think someone is maybe exaggerating here, but I'll take it as a compliment. Also, thanks to my Mum for this lovely easy recipe. ♥
Until next time!
Wednesday, 14 March 2012
Eat That Frog! How to get organised
Hey guys, I'm posting about being organised today - another big part of my life! Recently I bought a book called 'Eat That Frog', and the idea behind the title is this: all your tasks that you have to do are 'frogs', and a phrase that's mentioned in this book is: "if you have to eat two frogs, eat the ugliest one first". Basically, this means, if you have more than one important task that you must get done, do the hardest, most difficult one first. Then, when it comes to the next task, the worst is over and you can feel good about your accomplishment. Great, right?
I won't give too much away about this book, because I'm sure I'll get into trouble about giving away ideas from a book you have to pay for. What I will say, is that certain things inspired me to create a way of getting organised: making specific lists!
I printed out some of these free printables from Organised Home and used them to make my lists. What I have done is make four lists: my Master list, my Monthly list, my Weekly list, and my Daily list. I used the lined blank pages for these lists. You can just use scrap paper if you like, but I already had these printed out, so I thought I'd use them.
I start off by writing everything done on the Master and Monthly lists. This is things like "sort out what career I want to do after uni", "sort out my dissertation topic" (I'm a uni student). On my Monthly list I have things like my exam dates, and the essay deadlines, as well as any things that I can think of that need to be done in that month. (I don't include things such as bills to pay, as that is ongoing and repeated every month, so I have a separate calendar printable for that). I then turn to the Weekly list, and add some things from the Master and Monthly - so, you get a bit of an overlap on the lists of certain tasks - which are tasks such as any appointments I have that week, or that I need to pick up my new glasses. Finally I created a Daily list, the day before it is needed by - so, on Tuesday I write my list for Wednesday, and so on. The Daily list has all the trivial things on it, such as "do the laundry", "post X's birthday card" and so on.
Here's a photo of my papers. I purposefully took the photo from far away so you can't be nosey and read what I've written on my lists!

These lists really help, and as you can see, my daily one is pretty crossed-out! One other thing: don't ever feel bad if there are things on your list at the end of the day. You can always write it on your next Daily list. And don't forget, you can always add things on during the day, you don't have to panic and think that you have to remember everything you need to do tomorrow when writing your Daily list.
So now, if you incorporate these lists with what I learnt from one of the chapters in the book - eat that frog! Look at your Daily list, and see which task is the biggest, meanest, most horrible task, and do it! Obviously, if you have time contraints, like you have to call your bank before it shuts, do so, but in general, do the hardest task first. For me, that's usually my uni work. I will take doing housework over uni reading any day! So, applying this rule, I sat down and wrote an essay plan and got it finished. I felt really good about it, and then carried on my evening by doing all my other tasks. Usually, I do every other task possible before I get to my least favourite, with the thought that "but I've been doing a lot of things today, I can do that one later" - but then later gets too late, and I have to transfer that task over to the next day, where the same thing repeats. That way, I end up leaving an important task until really late, and then rushing it, stressing, and not have it done properly. If I do things this way, my essays will be done on time relatively stress-free.
This method can be applied to any person: whether you're a businessperson and you have a lot of important paperwork and deadlines, whether you're a housewife and have lots of housework, appointments, and children to deal with, or whether you're a student like me, and you have essays and reading to do. This method works really well for me, and I hope it works well for others. I have my papers sat on my desk (purposefully in the way) so I remember to consult them throughout the day to remind myself of what tasks I have to do.
Also, two other pointers:
I use this application called Stay Focused. It's an add-on for Google Chrome, and you can change all the settings so that it blocks you from certain websites for certain times. You can set it so that you can't go on Blogger or Facebook during work hours, or set it so that you can only go on it for 20minutes a day. It's up to you. It works great - during the day, when I'm supposed to be 'eating my frog', I tend to procrastinate and go on Facebook, or check my email about a dozen times. With this, I can stop myself from doing that all day, so I have more of a chance of staying focused.
And finally, my last tip. When I have to settle down and do my work, I find other things to do such as tidy my room until it is immaculate, or find something, such as my magazines, that need to be alphabetised right then, and the task seems so important I forget about my essays. What I've started to do, is to open up YouTube, and pick a song that I really like at the minute, and tell myself that I only have that much time to tidy up. That way I run around my room for around 4mins30, tidying up only the most important things, so that a) I have the 'tidying up' urge out of my system, b) my room is relatively tidy so I have space at my desk to sit down and do my work, and c) I don't spend an hour looking through my CDs.
This way, I manage to keep my procrastination down to a minimum (because I usually put the 'pro' into 'procrastination'), and manage to get around to doing most of my work without feeling stressed!
So there you have it. My organising tips. Quite a lot in one post. I felt that this was more of a pressing post than my knitting, because the only knitting that I have been doing recently is a scarf for Mother's Day, so it would have been a very short post, just like my scarf!
Until next time.
Wednesday, 7 March 2012
Knitted teddy and crocheted blanket
(I never know what to title my posts with!)
Today is Wednesday, and I decided that I need to post an update of everything that's been happening! I've been knitting a teddy for my Grandma's birthday - which is tomorrow - and got it finished over the weekend. I took a couple of pictures along the way, but completely forgot to take a picture of the final product. These are the latest pictures that I took:
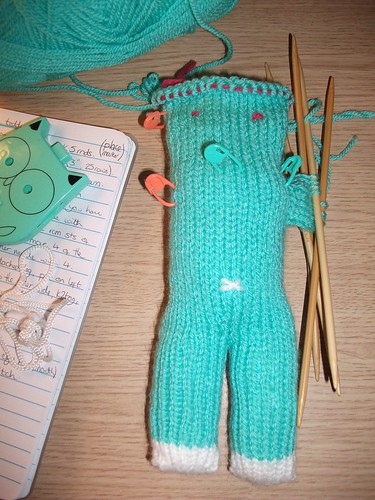
So, this is the teddy without the face, the arms and the sewn-up head.

...and this is the teddy with the face (white features and black safety eyes), picking up stitches at the side to attach the arms.
I will eventually like to post the pattern for this teddy, but I'd like to post a picture-guided pattern. I need to make a teddy for my Mum soon for Mother's Day, so I can do the pattern/pictures for that one. So stay tuned!
So, I had that teddy sat on my desk for about four days, and I completely forgot to take pictures of it completed. Yesterday, I wrapped it up to send off in the post to my Grandma - only then did I remember that I hadn't taken any pictures of it! Damn. Oh well. Like I said, I'll do a picture-guided pattern once I make the next teddy for my Mum.
The next project that I started, was my crochet Granny Stripe Blanket. Last week I posted a picture of the blanket sample that I made. I was planning on waiting until I had money to buy lots and lots of yarn for it, but I got too excited so I started with one of the balls of yarn that I already have. Naughty me. I took the yarn and my crochet hook to London for the weekend (I was visiting my boyfriend), and started the first few rows. The pattern requires you to chain 240 stitches. Every 20 stitches, I would place a marker, in order to make it easier to count the stitches at the end. Each set of 20 that I chained, I would count and count again, to make sure I had dead on 240. The pattern says that if you are out by one stitch, it can mess up the pattern (as it requires it to be a certain amount due to the repeat). Luckily, I had the right amount of stitches, so went along, chaining the next few rows. It took me a while to realise that the pattern said to chain the foundation chain loosely, and I later realised why. I had gotten to my second stripe when I noticed that my work would not lay flat, and that it was curving/bunching to one side - damn too-tight foundation chain.
So, unfortunately, I had to rip back the five rows that I had done, and start over again, with a bigger sized hook for the foundation chain (and then switched to the regular hook once I'd done the foundation) and start that dreaded Count all over again, checking and re-checking my stitch count, placing markers at every 20 stitch interval, making sure that the chain wasn't too tight. Nightmare. But, I am now on the 3rd or 4th row, and all is right in the world:

The next colour in my stripe sequence is this lime green colour. It looks lovely next to the purple. This blanket is going to be really brightly coloured. There will be 60 stripes in total, so depending on how many different colours of yarn that I will use, will depend on how many stripes of each colour I need. I'm undecided as to whether to do a random pattern, or to have a sequence of colours and an order to follow. Random would be good, but I'm quite OCD so I'm not sure if I can *do* random!
That's all for this week. Looking at my blanket makes me want to crochet more of it, but I have an essay to write with a deadline on Sunday, so I really ought to get cracking on that! I'm enjoying crochet so much at the moment (this is my first project) that I want to crochet at every possible opportunity, rather than studying. I have to restrict myself and 'reward' myself at the end of the day by crocheting before bed. Oh what an exciting life I lead!
Until next time - where I will have hopefully done more to my blanket, or have something new to report on this teddy for my Mum.
Monday, 27 February 2012
A secondary introduction to this blog
I haven't posted in a very long time. I partly put this down to my university course, as I have been very busy since September, but I also blame myself, for not putting in the effort once a week to write a blog post.
Over Christmas, I picked up the needles again and started knitting some more. I also began learning how to crochet, and even have taken an interest in quilling. I've been reading through a couple of craft blogs when I have been looking for patterns and designs, and have had a nosy through the rest of the blog for different people. It made me realise, that I wish I had a blog and I remembered, duh!, that I do have a blog; a very neglected one. I felt bad an immediately wanted to write in it to liven it up again, and share my crafty wonders with the world!
I have changed the URL of my blog to 'kadi2tog'. I'm wondering how long this will stay (knowing me, not very long). I thought it was quite amusing, as when you remove the 'di' from my name, it sounds like 'k2tog' anyway. ...yes, a very lame joke ...moving on...
So yes. I am back, with an introductory post telling you all that I am back, and that I promise, promise, promise (pinky promise!) that I will start blogging at least once a week. I realised that you can't just wing-it with a blog - it's best to have some sort of idea what you want to post about each week, so you don't end up rushed for time, or end up sitting at the keyboard with writer's block, not having made anything in the past week. So, I shall take my organisation OCD and whip up a plan each week of what to write.
I am rambling. I will stop. I have done so many things recently, but can't fit them all into one post, so I may have to backtrack and cover what I've done over the past few months. My latest projects have been to design my own teddy for my Grandma's birthday next month (the design of which I plan on writing up and posting online), and an increased interest in crochet. I want to knit a blanket in crochet - but first I'd need to buy supplies and to practice my treble crochet to get it perfect, before embarking on such a massive project. I'm really looking forward to it, though.
Oh, also, I'm getting a flat with my partner soon. Yay! I shall be moving out of my student accommodation and setting up home with him within the next few months. So exciting. I mustn't get too ahead of myself because we're still trying to find the ideal place. As soon as we find it, everything is Go!
That's enough for today. I'm off to do some more knitting of this teddy. ...I'll post a cheeky quick pic just to show you what I'm up to:
This is the teddy so far. The pink bits of threat are markers for where I'm going to place the safety eyes (they're on the way in the post). I'm knitting out the right arm by picking up stitches with a crochet hook and creating something to work with. I found the method here: http://www.youtube.com/watch?v=zt5h31YgclM&list=PLAB263A84CBC405EA&index=9&feature=plpp_video
I'll post a full entry about this little fella once I get going - must remember to take pictures at different stages! This is the little guy that I'm writing the pattern for, but I may need to make a couple of them before I get the pattern right (because that's what the professional knit designers do, right?). So, that'll be a fun task for me. Plus I'll have lots of cute lil' teddies laying around.
...and here's another photo of the sample I made yesterday for the Granny Stripe Blanket that I want to make:
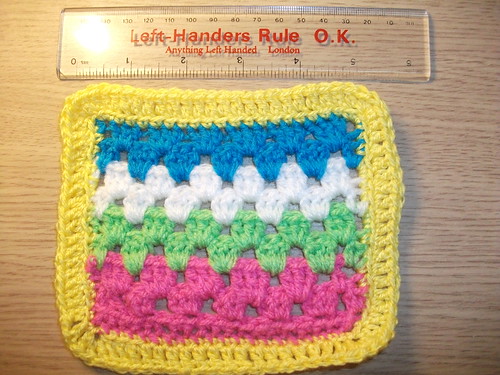
I really need to fix up my edges. I did it wrong, I think. I'm no crochet master, but I'm enjoying it so much. So long as I remember to keep my tension steady, everything should be fine. I found the pattern here: http://attic24.typepad.com/weblog/2010/05/granny-striping.html
The colours she uses are just lovely. I'd love to do something similar. It'd cost about £25 to get all the acrylic yarn that she used. A bargain, to be honest, as yarn isn't cheap. I need to settle into my new place first before I make any big spends like that. We're saving as much as we can to make sure we have enough. I'm itching so badly to go buy some yarn to start this project. I mean, I have a big plastic box full of yarn, but I need about 17 million balls of different colours for this blanket. I have nowhere near 17 million, I have about 20. So, I must be patient. At least it's something to look forward to, though!
That's enough from me today; I have to go to bed because I have lectures in the morning. Boo. I mean, yay for education, yay for learning, etc. etc.
Until next time, guys. Happy crafting ~ ♥
Sunday, 18 September 2011
It's been a very long time!
I am ever so sorry, I will make more of an effort to post, seeing as I haven't posted since the 28th August! By that point I had moved back to my Mum's to get ready to move to uni, and moved into my uni house with my boyfriend and one of my best friends on the 3rd Sept (with two more friends waiting to arrive shortly). So I spent a while unpacking, but surprisingly have been doing LOADS of knitting recently! My friend has become interested in knitting and has been learning the past two weeks, so we sit knitting together in the living room every day. I've been updating my ravelry, and because of that, I have been neglecting my blog. So sorry. :(
But here's my big list of all the things I've made in the past three weeks:


This is the front and back of my catnip bunny from ravelry (seriously, I love that site so much). It's so adorable, it's about 1x2inches big, it's so cute. ♥ The way that it's made confused and amazed me; an even number of stitches that follow the *knit 1 slip 1* pattern across, and it makes a little pouch that can be opened at the very end. I think it's adorable.
I also made a cowl, which I have yet to take a picture of, but my friend thought it'd be funny to take a pic of me struggling to get it on:

...I made the bind-off row too tightly knit, so I had to struggle with it to get it on, haha. But, it's really soft and warm, and when it does fit on properly, it feels good. I'll try to remember to take a pic of me actually wearing it. :) But, it was a nightmare to make, as for one it was on circular needles (which I find difficult to hold), and the pattern was repetitive and boring (one row of k5, p5, another row of k1,p1 etc). But, I finished it, and I'm really pleased. The original pattern said to knit it so that it was about 18inches long, but I didn't want a long one so I made a slightly-wider one, with less height and used up a ball of wool for it. Will come in very handy over the winter months.
Next up that I made (which I finished in the early hours of this morning) was this Celtic braid afghan square, which I only did two repeats of the pattern for, because I got bored and wanted to get on and do other projects. Here it is:


The first picture shows the cables better, but the second shows the actual colour of the wool. Silly 2am-lighting. I was so pleased with this, I made one small mistake in the left hand corner, but other than that I did quite well. I want to do a pattern similar to this for handwarmers/fingerless gloves, have a cable pattern running up the back of the hand. Just need to get the right sized needles then away I go. :)
And finally, the best 'til last, is 'Kevin', the Sheldon turtle pattern:


I freakin' love him. I made him for my friend that I live with, and I also have projects lined up for my boyfriend and other two friends that I'll be living with, but I did this one first as I had all the materials. It took me 6 days to fully complete him, just because I kept getting frustrated and having to put him down and start on something else. But tadaa, here he is, detachable shell and all. ♥
So now, after a mad few days finishing recent projects, I only have one project left, and that's my purple socks that I'm doing (toe-up design), but I don't have the heart to do them right now. For now, I'm gonna get ready for bed, get an early night, and get on knitting tomorrow. I'm going to try and keep up with my blog, but I just keep forgetting as I'm so involved with my ravelry account.
Adios~! ♥
Sunday, 28 August 2011
At last! I have finished my socks!
Yay! I'm so happy. It took like an hour of my time today to finish what could have been finished over a week ago. These have taken me about a month and a half to make as I put them off so many times. I know that if I were to make them again, though, I'd be able to make them very quickly. Here's some pics I took:

They're soooo cool! So worth the wait.

..and they're so comfy! If you look at the way they've been knitted, the stripes don't match because I didn't start each ball of wool at exactly the same colour point, so it gave them this unique effect.

See here, they're off by a fair bit, but the patterns do actually match up. I just love it. If I made another pair, I'd make sure I started at the same point, but I absolutely love these. If I knew these would have been worth it, I would've knit them a lot quicker.
So, a whole post dedicated to this pair of socks. And now my hands feel cold in comparison to my feet, so I'm finding some wrist warmers to make. Yay! ♥
Subscribe to:
Posts (Atom)