Hey everybody, this is just a quick one today. I wanted to share a document with you all of some hints and tips that are necessary for creating amigurumi. I've attached a link for a google drive document (it's a pdf) with pictures, information, and some links that may be useful. It also has some directions on how to use ravelry and searching for patterns and saving them for later.
Here's the link:
https://docs.google.com/file/d/0B-MLDmz4KulwMGRicXdWRzk3MHc/edit
If anyone has any questions or problems, just leave a comment below.
Showing posts with label toy. Show all posts
Showing posts with label toy. Show all posts
Thursday, 20 June 2013

Saturday, 1 June 2013
Crochet Chirpy Bird Tutorial
Look at this adorable little fella! Isn't he just so cute? I named him Chirpy Bird because he's so pudgy and cute, and looking at him makes me feel happy due to his lovely, bright colours.
 |
| Chirpy Bird! |
(Update: I've just amended the typo error for the legs in the pattern.)
Check out this Ravelry link to find a pdf of this pattern.
Details
·
3.5mm hook
· Small amounts of Sirdar Snuggly Baby Bamboo
o
4 colours for body
o
Orange for feet
o
Yellow for beak
·
9mm safety eyes
·
Toy stuffing
·
Tapestry needle
# ‘inc’ = 2 sc in one stitch
# ‘dec’ – decrease across next two stitches
Tips
For the joining of colours, you may want to check out this video by June Gilbank of Perfect Stripes for Amigurumi (YouTube). It creates a nice and easy seamless join.
For the decreases I like to use the method displayed by Nerdigurumi that creates an Invisible Decrease (YouTube). It really does create an invisible decrease that is hard to spot.
Tips
For the joining of colours, you may want to check out this video by June Gilbank of Perfect Stripes for Amigurumi (YouTube). It creates a nice and easy seamless join.
For the decreases I like to use the method displayed by Nerdigurumi that creates an Invisible Decrease (YouTube). It really does create an invisible decrease that is hard to spot.
Body
Each row is an
increase of 6. For each line, 1 sc is added between the inc’s in order to add 6
per round. Usually a pattern would read *1 sc, inc*; *2 sc, inc*; *3 sc, inc*;
and so on, but I have split up the even rounds to avoid that hexagonal shape
that forms when the inc’s are stacked round by round.
Overview: Increase by
6 stitches for the first 12 rounds. Sc around for the next 12 rounds. Decrease
by 6 stitches for the last 12 rounds.
Note: when changing
colours, make sure to tie the loose ends as you go. I simply double knotted my
loose ends together across the back.
In Pink:
1. 6 sc in a magic ring [6]
2. Inc around [12]
3. *1 sc, inc* around[18]
Change to Blue:
4. 1 sc, *inc, 2 sc* around, 1 sc [24]
5. *3 sc, inc* around [30]
6. 2 sc, *inc, 4 sc* around, 2 sc [36]
Change to White:
7. *5 sc, inc* around [42]
8. 3 sc, *inc, 6 sc* around, 3 sc [48]
9. *7 sc, inc* around [54]
Change to Green:
10. 4 sc, *inc, 8 sc* around, 4 sc [60]
11. *9 sc, inc* around [66]
12. 5 sc, *inc, 10 sc* around, 5 sc[72]
Change to Pink:
13 – 15. Sc
Change to Blue:
16 – 18. Sc
Pause here to insert the safety eyes on the row between the
Pink and the Blue.
Change to White:
19 – 21. Sc
Change to Green:
22 – 24. Sc
Change to Pink:
25. 5 sc, *dec, 10 sc* around, 5 sc [66]
26. *9 sc, dec* around [60]
27. 4 sc, *dec, 8 sc* around, 4 sc [54]
Change to Blue:
28. *7 sc, dec* around [48]
29. 3 sc, *dec, 6 sc* around, 3 sc [42]
30. *5 sc, dec* around [36]
Change to White:
31. 2 sc, *dec, 4 sc* around, 2 sc [30]
32. *3 sc, dec* around [24]
Pause here to stuff the body with toy stuffing.
33. 1 sc, *dec, 2 sc* around, 1 sc [18]
Change to Green:
34. *1 sc, dec* around [12]
35. dec around [6]
36. Cut yarn, thread needle, and sew up end. Tie up.
Beak
Here we create a circle that we will fold into a semi-circle and use, when stuffed, as the beak.
In Yellow:
1. 6 sc in a magic ring [6]
2. Inc around [12]
3. *1 sc, inc* around[18]
4. 1 sc, *inc, 2 sc* around, 1 sc [24]
5. *3 sc, inc* around [30]
Cut yarn, leaving a long tail. Fold the circle in half and begin to sew the two edges together. This should start to create a semi-circle. Stuff the beak lightly when ¾ of the seam has been sewn. Once complete, use the long tail to sew the beak to the body. Sew the flat side of the semi-circle to the row between the Blue and White colour-change on the body. This is the halfway point of the body.
Wings
Note: when changing colours, make sure to tie the loose ends as you go. I simply double knotted my loose ends together across the back.
In Pink:
1. 6 sc in a magic ring [6]
2. Inc around [12]
3. *1 sc, inc* around[18]
Change to Blue:
4. 1 sc, *inc, 2 sc* around, 1 sc [24]
5. *3 sc, inc* around [30]
6. 2 sc, *inc, 4 sc* around, 2 sc [36]
Change to White:
7 – 9. Sc around
Change to Green:
10 – 12. Sc around
Cut yarn, leaving a long tail. Flatten the piece, do not stuff. Sew the wings onto each side of the body on the same row that the eyes are attached. When sewing across, make sure to include both sides of the green wing to avoid any holes.
Legs
In the body, we
staggered the inc’s and dec’s in order to avoid the stacking that creates the
hexagon shape. For the feet, we want that hexagonal shape so we will
purposefully stack the inc’s and dec’s.
In Orange:
1. 6 sc in a magic ring [6]
2. Inc around [12]
3. *1 sc, inc* around[18]
4. *2 sc, inc* around [24]
5. *2 sc, dec* around [24]
6. *1 sc, dec* around [12]
7. dec around [6]
8-11. sc around
Cut yarn, leaving a long tail. To shape the feet, push the
base of the foot towards the leg – this should create a flat, hexagonal foot
shape. Do not stuff. Attach the legs to the row between the pink and blue
stripes. Line up the legs so that they are the midpoint between the eyes and
wings on each side.

And there you go! You've made your very own Chirpy Bird!

Enjoy!
Monday, 27 February 2012
A secondary introduction to this blog
I haven't posted in a very long time. I partly put this down to my university course, as I have been very busy since September, but I also blame myself, for not putting in the effort once a week to write a blog post.
Over Christmas, I picked up the needles again and started knitting some more. I also began learning how to crochet, and even have taken an interest in quilling. I've been reading through a couple of craft blogs when I have been looking for patterns and designs, and have had a nosy through the rest of the blog for different people. It made me realise, that I wish I had a blog and I remembered, duh!, that I do have a blog; a very neglected one. I felt bad an immediately wanted to write in it to liven it up again, and share my crafty wonders with the world!
I have changed the URL of my blog to 'kadi2tog'. I'm wondering how long this will stay (knowing me, not very long). I thought it was quite amusing, as when you remove the 'di' from my name, it sounds like 'k2tog' anyway. ...yes, a very lame joke ...moving on...
So yes. I am back, with an introductory post telling you all that I am back, and that I promise, promise, promise (pinky promise!) that I will start blogging at least once a week. I realised that you can't just wing-it with a blog - it's best to have some sort of idea what you want to post about each week, so you don't end up rushed for time, or end up sitting at the keyboard with writer's block, not having made anything in the past week. So, I shall take my organisation OCD and whip up a plan each week of what to write.
I am rambling. I will stop. I have done so many things recently, but can't fit them all into one post, so I may have to backtrack and cover what I've done over the past few months. My latest projects have been to design my own teddy for my Grandma's birthday next month (the design of which I plan on writing up and posting online), and an increased interest in crochet. I want to knit a blanket in crochet - but first I'd need to buy supplies and to practice my treble crochet to get it perfect, before embarking on such a massive project. I'm really looking forward to it, though.
Oh, also, I'm getting a flat with my partner soon. Yay! I shall be moving out of my student accommodation and setting up home with him within the next few months. So exciting. I mustn't get too ahead of myself because we're still trying to find the ideal place. As soon as we find it, everything is Go!
That's enough for today. I'm off to do some more knitting of this teddy. ...I'll post a cheeky quick pic just to show you what I'm up to:
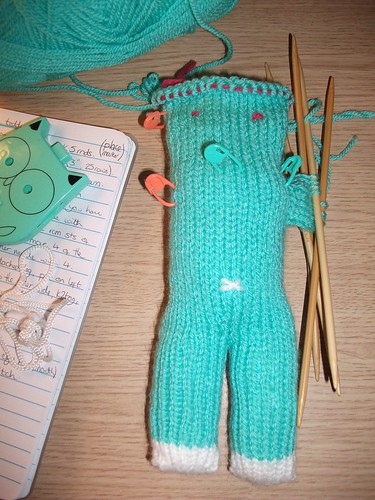
This is the teddy so far. The pink bits of threat are markers for where I'm going to place the safety eyes (they're on the way in the post). I'm knitting out the right arm by picking up stitches with a crochet hook and creating something to work with. I found the method here: http://www.youtube.com/watch?v=zt5h31YgclM&list=PLAB263A84CBC405EA&index=9&feature=plpp_video
I'll post a full entry about this little fella once I get going - must remember to take pictures at different stages! This is the little guy that I'm writing the pattern for, but I may need to make a couple of them before I get the pattern right (because that's what the professional knit designers do, right?). So, that'll be a fun task for me. Plus I'll have lots of cute lil' teddies laying around.
...and here's another photo of the sample I made yesterday for the Granny Stripe Blanket that I want to make:
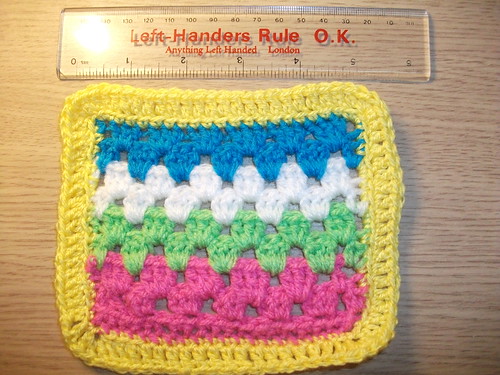
I really need to fix up my edges. I did it wrong, I think. I'm no crochet master, but I'm enjoying it so much. So long as I remember to keep my tension steady, everything should be fine. I found the pattern here: http://attic24.typepad.com/weblog/2010/05/granny-striping.html
The colours she uses are just lovely. I'd love to do something similar. It'd cost about £25 to get all the acrylic yarn that she used. A bargain, to be honest, as yarn isn't cheap. I need to settle into my new place first before I make any big spends like that. We're saving as much as we can to make sure we have enough. I'm itching so badly to go buy some yarn to start this project. I mean, I have a big plastic box full of yarn, but I need about 17 million balls of different colours for this blanket. I have nowhere near 17 million, I have about 20. So, I must be patient. At least it's something to look forward to, though!
That's enough from me today; I have to go to bed because I have lectures in the morning. Boo. I mean, yay for education, yay for learning, etc. etc.
Until next time, guys. Happy crafting ~ ♥
Sunday, 18 September 2011
It's been a very long time!
I am ever so sorry, I will make more of an effort to post, seeing as I haven't posted since the 28th August! By that point I had moved back to my Mum's to get ready to move to uni, and moved into my uni house with my boyfriend and one of my best friends on the 3rd Sept (with two more friends waiting to arrive shortly). So I spent a while unpacking, but surprisingly have been doing LOADS of knitting recently! My friend has become interested in knitting and has been learning the past two weeks, so we sit knitting together in the living room every day. I've been updating my ravelry, and because of that, I have been neglecting my blog. So sorry. :(
But here's my big list of all the things I've made in the past three weeks:


This is the front and back of my catnip bunny from ravelry (seriously, I love that site so much). It's so adorable, it's about 1x2inches big, it's so cute. ♥ The way that it's made confused and amazed me; an even number of stitches that follow the *knit 1 slip 1* pattern across, and it makes a little pouch that can be opened at the very end. I think it's adorable.
I also made a cowl, which I have yet to take a picture of, but my friend thought it'd be funny to take a pic of me struggling to get it on:

...I made the bind-off row too tightly knit, so I had to struggle with it to get it on, haha. But, it's really soft and warm, and when it does fit on properly, it feels good. I'll try to remember to take a pic of me actually wearing it. :) But, it was a nightmare to make, as for one it was on circular needles (which I find difficult to hold), and the pattern was repetitive and boring (one row of k5, p5, another row of k1,p1 etc). But, I finished it, and I'm really pleased. The original pattern said to knit it so that it was about 18inches long, but I didn't want a long one so I made a slightly-wider one, with less height and used up a ball of wool for it. Will come in very handy over the winter months.
Next up that I made (which I finished in the early hours of this morning) was this Celtic braid afghan square, which I only did two repeats of the pattern for, because I got bored and wanted to get on and do other projects. Here it is:


The first picture shows the cables better, but the second shows the actual colour of the wool. Silly 2am-lighting. I was so pleased with this, I made one small mistake in the left hand corner, but other than that I did quite well. I want to do a pattern similar to this for handwarmers/fingerless gloves, have a cable pattern running up the back of the hand. Just need to get the right sized needles then away I go. :)
And finally, the best 'til last, is 'Kevin', the Sheldon turtle pattern:


I freakin' love him. I made him for my friend that I live with, and I also have projects lined up for my boyfriend and other two friends that I'll be living with, but I did this one first as I had all the materials. It took me 6 days to fully complete him, just because I kept getting frustrated and having to put him down and start on something else. But tadaa, here he is, detachable shell and all. ♥
So now, after a mad few days finishing recent projects, I only have one project left, and that's my purple socks that I'm doing (toe-up design), but I don't have the heart to do them right now. For now, I'm gonna get ready for bed, get an early night, and get on knitting tomorrow. I'm going to try and keep up with my blog, but I just keep forgetting as I'm so involved with my ravelry account.
Adios~! ♥
Tuesday, 23 August 2011
Finished elefante!
Yay! I finally finished the little elephant! His ears are floppy, and his head lolls about, but nevertheless he's still very cute and my sister is going to love him:


He's so cute! He's my proudest achievement in knitting, I'm so pleased. I feel sad giving him to my sister but I know she'll look after him. He was quite easy to make (and the pattern can be found on ravelry), and the hardest part was sewing his head onto the body - I'm terrible at sewing, and the reason why his head is floppy is because of this, but yeah, he still looks cute.
Also, I've been getting broody to knit baby clothes, but don't have enough wool or the right size needles to make cardigans, so I made a teeny tiny sock from a pattern on ravelry that I found:

This is the ickle sock on it's own...

...and this is it next to the sock that I made for myself to wear (with my diddy size 3 feet, so even that sock isn't that big). It's so cute, and I'm in love with this wool. I'll have to remember what brand this wool is, and get some more in different colours. Speaking of my pair of socks, I've almost finished the second one of the pair - I need to knit a few more rows then begin the decrease for the toe, so soon I'll have lovely warm socks to wear.
Right now I'm not sure what my next project is going to be - I might finish off this little orange chubby chirp that I'm making, as well as finishing off my sock. I'm also trying to come up with a design for the teddies that I make - y'know, the ones that I showed in my first post:

I want to change the pattern so that it can be knitted on dpns, and will show the purl side on the outside, rather than be made with garter stitch. All I've got to do is work out the frequency of increases and decreases, and do a test knit for the sizes of the arms, legs, etc. Should be a fun project. One day I'd like to create my own patterns, such as sock patterns, and see about selling the patterns or the actual socks. I know it'd take a while before I get to the stage where the patterns are good enough to sell (I'd have to start off with free patterns) but hey, you have to start somewhere.
Right, I'm off. It's my sister's birthday tomorrow so I've gotta sort my stuff out today to travel down tomorrow morning. Adios, knitters!
Saturday, 13 August 2011
I am a bad person!
I haven't posted in goodness knows how long, shame on me! Unfortunately I've become somewhat addicted to World of Warcraft, so a lot of my spare time has gone to playing that. On the bright side, I have a new job (making milkshakes and smoothies), so I can start earning some pennies and hopefully buy some more much-needed wool, and in even better news, I've literally just finished my first sock!

It's sooo pretty, and sooo comfy! And the greatest thing is that I have size 3 feet, so it was quick to knit the sole part of the foot, haha. I'm looking forward to knitting the second one - my initial idea was to make any old pair of socks, just to say I've done it, but this one fits so snugly, I actually think I'll wear them!
Also, I've been making an elephant for my sister's birthday, which is the 24th August. I found the pattern on ravelry (called 'elephante') and so far I've done the body and the head. I'm struggling with the ears as they need to be crocheted and I haven't the foggiest how to do it, so I'm going to nick some ears from a different pattern. Here's my progress so far:

(Mm, and look at the difference in picture quality. I may start taking more pics with my actual camera rather than my blackberry). It was so fun to make, and the stripy pattern is so cute. I'm so pleased with this. These two projects, the elephant and the socks, are my more complicated but rewarding things to have made.
So I'm off now to finish watching The Back-Up Plan (which is hilarious) while the other half is doing a raid on WoW, and to continue by finding something else to start knitting. ♥
Thursday, 14 July 2011
Chubby Chirps
Yesterday I started to make a 'chubby chirp'. I've just found the link where I found the pattern from, and you can find it here. It was my first time using dpns, and I was so chuffed with what work I'd done.


I used some old wool that I had sitting around. I need to stuff it and then sew up the top, but alas, I have no stuffing! I need to go buy some. I'd go right now, but I'm house sitting waiting for a parcel, so I can't go anywhere yet.
I want to create a page of all my projects that I have to do, to see what I need to finish, etc. I have a habit of starting a project and not finishing it, because I get sidetracked by other projects - typical, I suppose.
But yeah. I'm so pleased with my work with dpns and want to make something else, now. That little thing up there that I made took me about 3-4 hrs! Very long process (and to be honest I was watching tv at the same time as knitting) but very rewarding. I look forward to finishing it. For now, I'm off to start on another square of my Refuge blanket.
Subscribe to:
Posts (Atom)